
Super Coding Addict
어드민 페이지 만들기 (1) 본문
< Get방식 >
* com.example.study.controller 패키지 - GetController
package com.example.study.controller;

import com.example.study.model.SearchParam;
import org.springframework.web.bind.annotation.*;

@RestController
@RequestMapping("/api") //localhost:8080.api
public class GetController {

    @RequestMapping(method = RequestMethod.GET, path = "/getMethod")    //localhost:8080/api/getMethod
    public String getRequest(){
        return "Hi getMethod";
    }

    @GetMapping("/getParameter")    //localhost:8080/api/getParameter?id=1234&password=abcd
    public String getParameter(@RequestParam String id, @RequestParam(name = "password") String pwd){
        String password = "bbbb";
        System.out.println("id : " + id );
        System.out.println("pwd : " + pwd );

        return id+pwd;
    }

    //localhost:8080/api/getMultiParameter?account=abcd&email=study@gmail.com&page=10
    @GetMapping("/getMultiParameter")
    public SearchParam getMultiParameter(SearchParam searchParam){   //객체통해 받기
        System.out.println(searchParam.getAccount());
        System.out.println(searchParam.getEmail());
        System.out.println(searchParam.getPage());

        //JSON형태로 내려오려면?! 객체반환!
        // {"account" : "", "email" :"", "page" : 0 }
        return searchParam;
    }
}
- @RequestMapping을 쓰는 경우, method와 path를 모두 명시해줘야 한다
==> @GetMapping을 쓰면 get method이므로 path만 () 안에 써주면 됨!
- @GetMapping에서 get방식으로 파라미터를 전달받을 때, 파라미터 앞에 @RequestParam으로 어노테이션을 달아준다
==> 이 때 들어오는 이름과 받아주는 이름이 다른 경우, @RequestParam(name = "들어오는 이름")을 써주면 들어오는 이름으로 인식되어 값이 들어온다
- 다양한 파라미터값들을 받아야하는 경우, 객체로 한번에 받을 수 있다
- 이 객체를 return하면 json형태로 객체의 키-값이 반환된다.
==> 여기서는 다음과 같이 SearchParam 객체를 만들어두었다
* com.example.study.model 패키지 - SearchParam 클래스
package com.example.study.model;

import lombok.AllArgsConstructor;
import lombok.Data;

@Data
@AllArgsConstructor
public class SearchParam {

    private String account;
    private String email;
    private int page;

/*    public String getAccount() {
        return account;
    }

    public void setAccount(String account) {
        this.account = account;
    }

    public String getEmail() {
        return email;
    }

    public void setEmail(String email) {
        this.email = email;
    }

    public int getPage() {
        return page;
    }

    public void setPage(int page) {
        this.page = page;
    }*/
}
--> lombok을 설정하지 않으면, 직접 getter와 setter 또는 생성자를 만들어두어야 한다.
< Post 방식 > : body에 값들이 담겨 숨겨져 온다
* com.example.study.controller 패키지 - postController
package com.example.study.controller;

import com.example.study.model.SearchParam;
import org.springframework.web.bind.annotation.*;

@RestController
@RequestMapping("/api")
public class PostController {

    // HTML <Form>
    // ajax 검색 -- 검색 파라미터가 많다
    // http post body -> data
    // json, xml, multipart-form / text-plain

    //@RequestMapping(method = RequestMethod.POST, path = "/postMethod")
    @PostMapping(value = "/postMethod")
    public SearchParam postMethod(@RequestBody SearchParam searchParam){
        return searchParam;
    }

}
--> @GetMapping일때와 달리 @PostMapping에서는 파라미터 앞에 @RequestBody 어노테이션을 달아준다
--> 여기서도 객체를 리턴하였으므로 json형식으로 결과값이 반환된다

--> api tester에서 직접 post방식으로 서버에 요청하기
데이터의 정보를 알려주는 Header에서 Content-Type은 application/json으로 설정하고,
Body에서 값을 json형식으로 넘겨준다
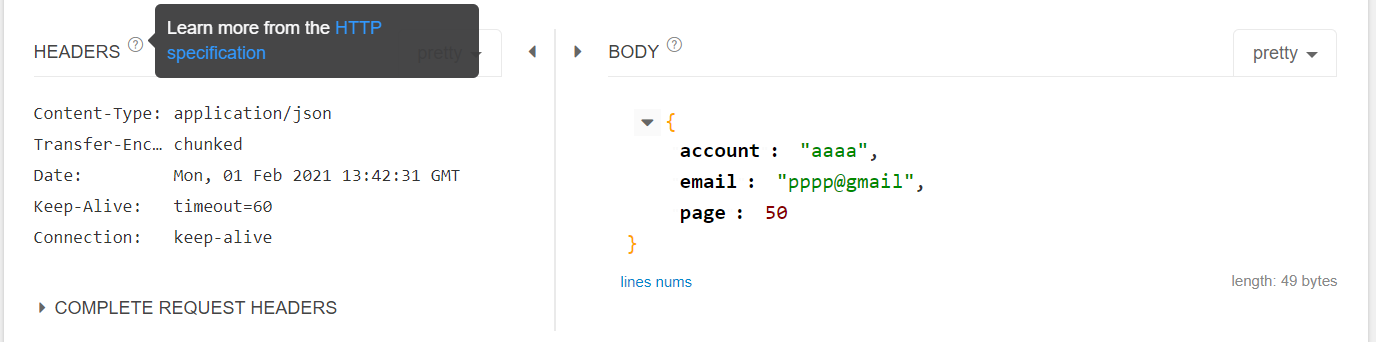
--> 서버 구동 후 결과를 확인해보면, 예상한대로 넘겨준 값이 json형태로 잘 출력되었다
< Lombok >
- 앞에서 객체인 SearchParam 클래스에서 직접 getter, setter를 만들어주었으나 lombok 라이브러리를 쓰면 이러한 수고를 덜어준다
- 코드도 굉장히 깔끔해진다
* Lombok 사용하기
- IntelliJ기준(Windows) : [File] - [Settings] - [plugins] 에서 lombok을 검색하여 install (나는 미리 번들로 껴있었다)
- build.gradle에서 의존성 추가를 한다
dependencies {
	compile 'org.projectlombok:lombok:1.18.10'
	annotationProcessor 'org.projectlombok:lombok:1.18.10'
	...
}
( 만약 gradle이 업데이트 되는 것이 안보이면, Gradle창에서 build-clean을 한 뒤, 다시 로딩 )
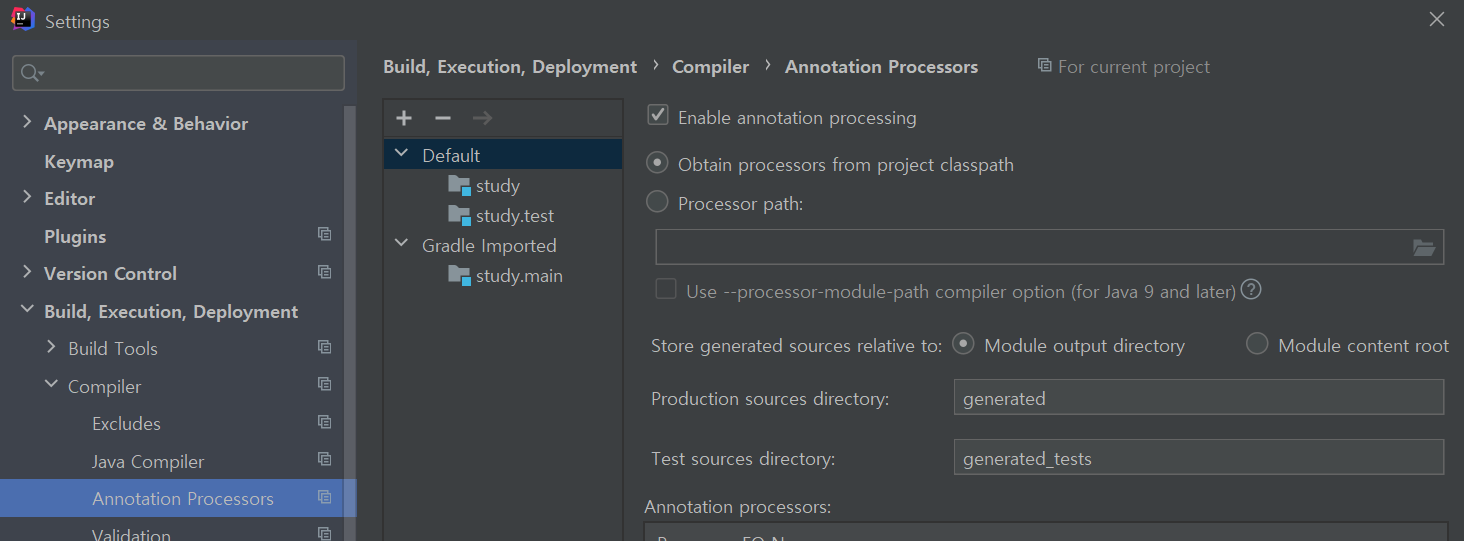
- [File] - [Settings] - Build, Execution, Deployment - compiler - Annotation Processors에서 Enable annotion processing 체크! 한뒤 적용
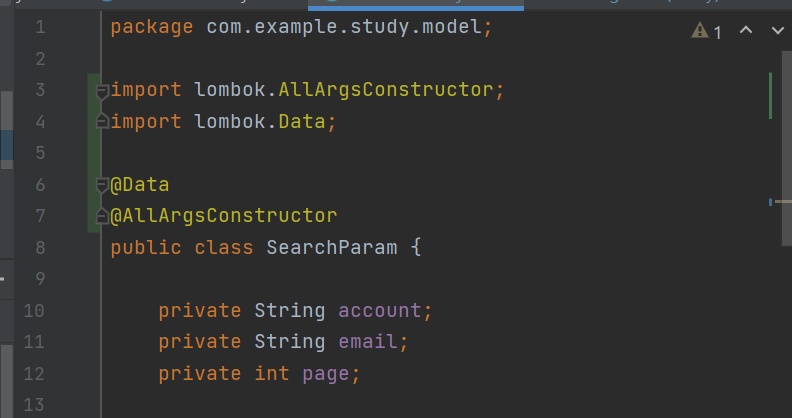
-> 위와 같이 객체 클래스로 돌아와 @Data 어노테이션을 달아준다
-> 모든 인자들을 받는 생성자를 만들고 싶다면, @AllArgsConstructor 어노테이션을 달아준다
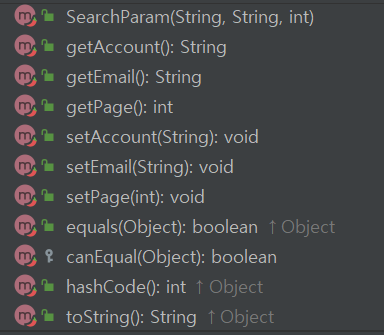
-> lombok을 적용한 결과 다음과 같이 생성자, getter / setter, 그리고 toString 등 편리한 메서드들이 자동으로 추가되었음을 Structure에서 확인해볼 수 있다
'Spring Boot 웹개발' 카테고리의 다른 글
| 어드민 페이지 만들기 (2) (0) | 2021.02.04 |
|---|---|
| 회원 관리 예제 (1) (0) | 2021.01.31 |
| 스프링 웹 개발 기초 (0) | 2021.01.31 |
| 빌드하고 실행하기 (0) | 2021.01.30 |
| 라이브러리 살펴보기 (0) | 2021.01.30 |


